Help for manual installation
As pointed out on the install page, this script is not maintained anymore. Use it at your own risk and only if you have nothing already running on your server. That script do/docs/install/esn't secure your server, thus installing fail2ban and changing SSH default port could be a good idea.
#!/bin/sh
#That script :
# 1. Defines the main steps through functions.
# 2. Calls them
#
# Initialize the environnment by updating server and installing apache2, php and several requirements
#
init() {
apt-get update
apt-get -y upgrade
apt-get install -y git apache2 unzip
#Install php
apt-get install -y php libapache2-mod-php php-mcrypt php-mysql php-xml
}
#
# Create a new user and register Jeyser's subdomain.
#
configure_user(){
echo "For security reasons, we will create a new user and avoid root login through SSH.
New user's name ?"
read new_user
while [ $new_password != $new_password_confirmation ] || [ $new_password == "" ]; do
echo "Mot de passe du nouvel utilisateur ?"
read new_password
echo "Confirmation du mot de passe ?"
read new_password_confirm
if [ $new_password != $new_password_confirm ]; then
echo "Passwords don't match, retry. "
fi
done
useradd -m -d "/home/$new_user/" -s /bin/bash $new_user
echo $new_password | passwd $new_user
adduser $new_user sudo
adduser $new_user www-data
echo "Jeyser CRM sub domain ?"
read sub_domain
}
#
# Configure Apache :
# - Give PHP files the highest priority.
# - Activate mod_rewrite for URL Rewriting.
# - Change DocumentRoot to where Jeyser will be installed.
#
configure_apache(){
sed -i 's/DocumentRoot \/var\/www\/html/DocumentRoot \/var\/www\/html\/Incipio\/web/g' /etc/apache2/sites-enabled/000-default.conf
cat > /etc/apache2/mods-enabled/dir.conf <<'endmsg'
<IfModule mod_dir.c>
DirectoryIndex index.php index.html index.cgi index.pl index.xhtml index.htm
</IfModule>
endmsg
a2enmod rewrite
service apache2 restart
}
#
# Install Mysql and secure installation (executed commands are the same that mysql_secure_installation would give)
# Create a mysql user for Jeyser
#
install_mysql(){
echo -e "\033[36m Heads Up !
We are going to set up the database. It is where all informations will be stored. We will create 2 accounts :
- An administrator account : root
- A user with limited access for Jeyser : incipio.
Carefully write the passwords you will choose for root and incipio because they will protect all your data.
Press return to confirm.\e[0m "
read validation
apt-get install -y mysql-server
#create a mysql user with limited rights on only one db
cat > ./mysql_secure_installation.sql <<'endmsg'
DELETE FROM mysql.user WHERE User='root' AND Host NOT IN ('localhost', '127.0.0.1', '::1');
DROP DATABASE IF EXISTS test;
DELETE FROM mysql.db WHERE Db='test' OR Db='test\\_%';
FLUSH PRIVILEGES;
endmsg
echo "\033[33m Type your mysql root password \e[0m"
mysql -u root -p < mysql_secure_installation.sql
rm ./mysql_secure_installation.sql
cat > ./install.sql <<'endmsg'
create database incipio;
grant usage on *.* to incipio@localhost identified by 'incipiopass';
grant all privileges on incipio.* to incipio@localhost;
Flush privileges;
endmsg
echo "\033[33m Type your mysql root password again\e[0m "
mysql -u root -p < install.sql
rm ./install.sql
}
#install composer.
install_composer(){
cd /var/www/html
EXPECTED_SIGNATURE=$(wget -q -O - https://composer.github.io/installer.sig)
php -r "copy('https://getcomposer.org/installer', 'composer-setup.php');"
ACTUAL_SIGNATURE=$(php -r "echo hash_file('SHA384', 'composer-setup.php');")
if [ "$EXPECTED_SIGNATURE" != "$ACTUAL_SIGNATURE" ]
then
>&2 echo 'ERROR: Invalid installer signature'
rm composer-setup.php
break
fi
php composer-setup.php --quiet
RESULT=$?
rm composer-setup.php
if [ ! -f ./composer.phar ]; then
echo "Composer not installed, trying with repository version"
apt-get install -y composer
fi
mv ./composer.phar /usr/local/bin/composer
echo "You should see Composer version just below. Press Enter to continue."
composer --version
read validation
}
install_jeyser(){
#install jeyser
cd /var/www/html
git clone https://github.com/n7consulting/Incipio.git
cd Incipio
#installation of php dependencies for production.
composer install --no-dev
#should display symfony version.
php app/console --version
#let's go for db setup !!
php app/console doctrine:schema:update
php app/console doctrine:fixtures:load -n
php app/console assets:install
#Make newly created user the owner of all that
chown -R $new_user /var/www/html/Incipio
chgrp -R www-data /var/www/html/Incipio
}
install_ssl(){
#on configure openssl
a2enmod ssl
apt-get install -y python-letsencrypt-apache
service apache2 restart
}
echo "
Welcome on Jeyser installation script.
IT IS DESIGNED TO CREATE A PRODUCTION ENVIRONNMENT. DONT USE IT FOR DEV !!
THIS SCRIPT HAS BEEN WELL-TESTED. HOWEVER, IF IT FAILS, DONT TRY TO RUN IT AGAIN, CONTACT DSI@N7CONSULTING.FR
and provide a detail of everything that is written on your console.
To get a SSL Certificate, it's better if you have already mapped a subdomain to that server's ip. If you didn't, stop that script or configure letsencrypt on your own.
You can get support by contacting dsi@n7consulting.fr
Are you ready to begin installation ?
"
read -p "Type Yes or no : " prompt
#if [[ $prompt =~ [yY](es)* ]]
if true
then
${new_user} = ""
${new_password} = "dummy"
${new_password_confirm} = "dummy"
${sub_domain} = ""
mkdir -p /var && mkdir -p /var/www && mkdir -p /var/www/html
cd /var/www/html
configure_user
init
configure_apache
install_mysql
install_composer
install_jeyser
else
break;
fi
SSH Key connection
Some of the providers don't allow connection with a password. Here is a guide on SSH key. Be warned that it's more difficult than password and requires more manipulations. On the other hand, it provides a better security (as long as you don't loose the key).
That chapter is not a cryptography lesson. If you are interested in the background, please refer to RSA encryption and Secure shell
On Windows
If you need that authentication mode, the key creation process also uses Putty.
If you haven't already, Download PuTTY, a SSH client for Windows.
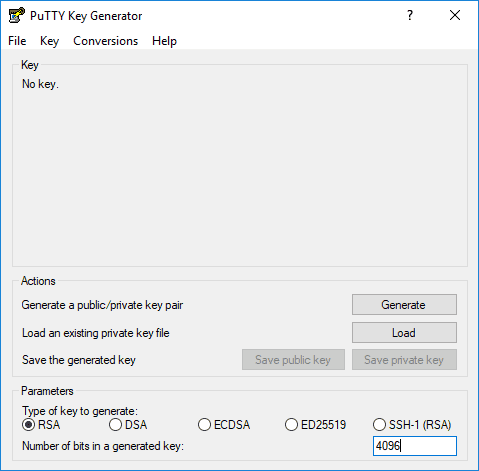
Once Putty installed, launch Puttygen (provided with putty).
- As for "Number of bits in a generated key", choose
4096
.

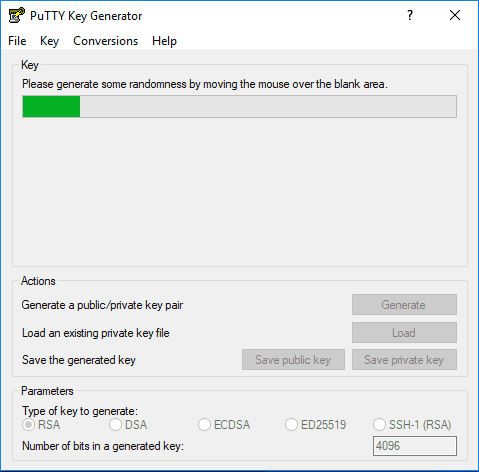
- Your key requires a source of randomness to be secure. Click on "Generate" and move your mouse in the frame.
- You will the be asked a "Key passphrase", it is a password that will protect yout private key.
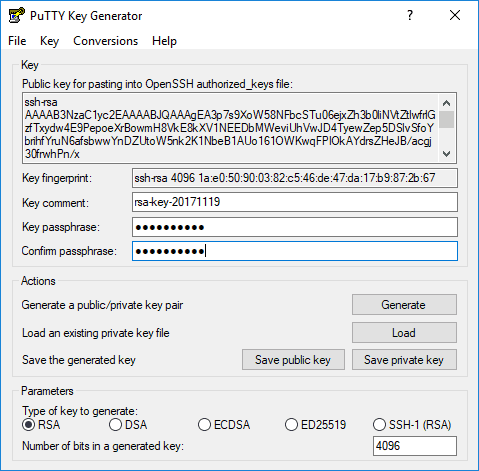
- Vous pouvez ensuite sélectionner successivement "Save public key" et "Save private key" pour enregistrer les clés dans vos documents respectivement sous les noms "clepublique" et "cleprivee".
NOTE: Ces clés sont liées mais il n'est pas possible de retrouver l'autre si l'une est perdue. Vous devriez les conserver ensemble. Faites attention de ne pas les perdre sinon il faudra en créer de nouvelles.
IMPORTANT: La clé privée ne doit être communiquée qu'aux personnes physiques que vous autorisez à se connecter à votre serveur.
Votre clé publique à saisir dans votre espace client sur le site de votre hébergeur se situe dans le cadre déroulant en haut de Putty et si besoin dans le fichier "cle_publique".
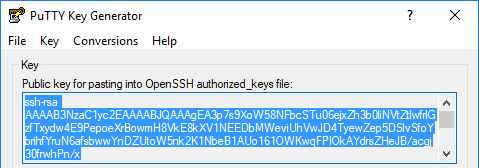
Vous pouvez à présent la copier, fermer PuTTYgen et démarrer PuTTY.
- Dans le menu à gauche, sélectionnez "Connection" puis "SSH" puis "Auth".
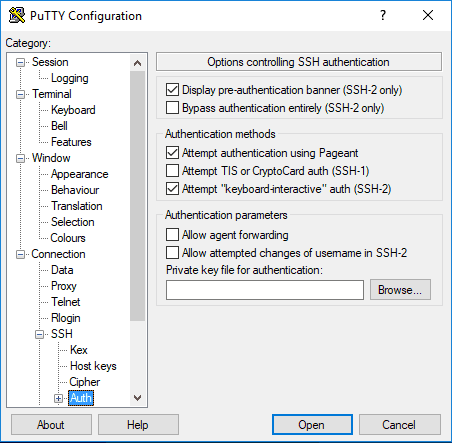
- Pour le champ "Private key file for authentication", cliquez sur "Browse" pour aller chercher le fichier "cle_privee".

- Dans le menu à gauche, revenez à "Session". Entrez l'adresse IP de votre serveur (ou le nom de domaine si vous en avez acheté un), laissez le port 22 et la connection de type SSH.
Pour que toutes ces manipulations restent enregistrées dans Putty, vous pouvez donner un nom dans le champ "Saved Sessions" et cliquer sur "Save".
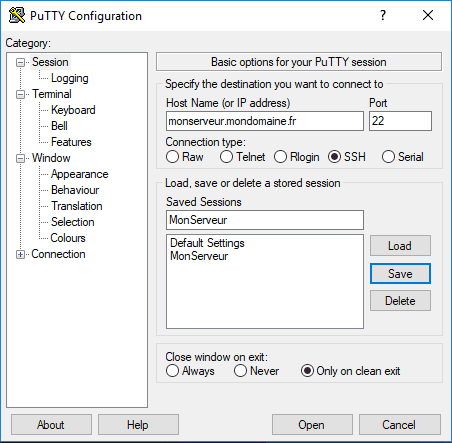
Tout est prêt, vous pouvez cliquer en bas sur "Open" pour vous connecter à votre serveur.
Warning If you loose the key, you might (depending on your provider) loose the access to your server.