Environment
This part brings you from a standard computer to an environment ready for Jeyser installation. In this part you will install the required software to connect a server, book a server and point a subdomain to its IP address.
If DNS and SSH are already familiar to you, you can probably skip to the next chapter.
Web server
Jeyser requires a web server to run. To begin with we will guide you in your server choice and its preparation process.
Hosting provider
A provider is a company providing servers and other web related products such as domain names. If you already have a website, you probably also have a provider. There are a lot of hosting provider, the main ones in France are 1and1, OVH, Online. They provide different offers with different service quality.
The minimal requirements for Jeyser is a Virtual PrivateServer (VPS) with 1 vCore and 1Go of RAM.
Here is a small list of provider which provides some decent hosting for Jeyser.
-
OVH 2,99€ / month | 1 vCore | 2Go RAM | 10Go SSD storage
-
Scaleway 2,99€ /month | 2 vCore | 2Go RAM | 50Go SSD storage
This list is just the providers used by N7 Consulting and M-Gate. We have no additional business ties with them. If you are just a beginner, we strongly advocates for OVH which provides an easier management (no need to handle a SSH Key).
As for localization, the closer, the better, thus choose somewhere in France (or Germany if France is not available).
As for Operating System, choose Ubuntu 18.04 because it is the only OS against which our installation process is regularly tested.
During the server booking process you will have to create an account (if you don't already have one) and give some bank account information.
Domain name
To get an automatic, free SSL certificate (https) you will have to provide a valid domain name for Jeyser. A domain name is a name on the internet.
It can be your own such as n7consulting.fr or something provided by your school such as bde.enseeiht.fr.
It does not matters, as long as you can point a name to the IP of your server.
Every hosting provider is also a registrar (a company which sells domain name). If you don't already have a domain name, buy it at the same provider as your hosting. If you already have one, great! If you don't have one (or can't have access to one through your school), you can buy one at the following registrar.
At N7 Consulting, our servers are rent at OVH and domain is registered at 1and1 and it works perfectly.
Connect to your new server
Once you paid your server, you should receive an email with your new server IP adress, a account name (usually root) and a password.
Several providers, such as Scaleway, demand a SSH Key to connect your server. In that case, please refer to the annexes "SSH Key connection".
Windows
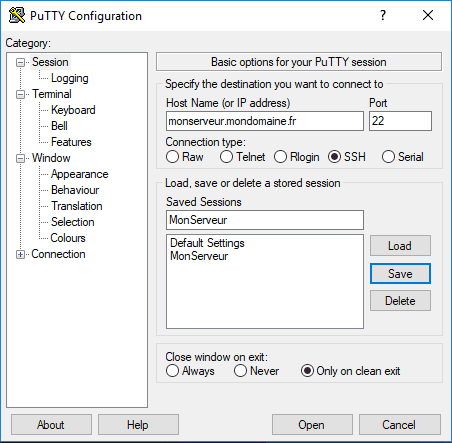
To connect to a server you need a software (a SSH client) called Putty.
Download and install it using default options
Once installed, launch it.

-
Fill Hostname with your server IP address (or the domaine name if it already point to your server IP)
-
Let the other values to their default unless you configured your server differently
-
(Optionnal) To save this configuration in Putty, you can it a name in the field Saved Sessions and click save.
-
At the bottom click Open to connect your server.
-
Then give the account name (specified in the booking confirmation email).
-
Validate by pressing Return because everything has to be done through keyboard. Fill your password, validate, and you are in!
Well done. The hardest is now behind.
Note: If you are asked about SSH key, read SSH key connection
Pointing a subdomain to an IP address guides
Illustrated process of how to point a subdomain on an IP adress
-
Contributions are welcomed. Add your own guide.